| Gnome Rises |
“Gnome Rises” Manual
Overview
Gnome Rises is a board game inspired economical strategy game.
Your job is to help a poverty-stricken gnome to climb out of his homelessness by creating a money generating business which ultimate results in him building his own bank
You’ll have various buildings, upgrades & your loyal friendly workers to aid you in your quirky quest.
All hands aboard!
- Overview
- 1. General Info
- 1.1 Main Game Screen
- 1.2 Pause Screen
- 1.3 Indicator
- 1.4 Upkeep Screen
- 2. Buildings
- 2.1 Woods
- 2.2 Shop
- 2.3 Bush
- 2.4 Bench
- 2.5 Clay Hill
- 2.6 Pier
- 2.7 Fireplace
- 2.8 Farm
- 2.9 Storage House
- 2.10 Restaurant
- 2.11 Brewery
- 2.12 Bank
- 3. Workers
- 4. Intense Mode
- 4.1 Differences from Casual Mode
- Tips & tricks
1. General Info
The game features two game difficulties: “Casual” and “Intense” that add two distinct flavors.
Manual is written as to the “Casual” game mode, thought most of it applies to the “Intense” mode as well, with the exceptions discussed at the “Intense mode” section.
1.1 Main Game Screen

This is the main gameplay screen
1 – These indicate your current resource amounts
2 – Game time. Every minute you’ll have to deal with the food demand. Compete with other players for fastest game completion time
3 – Various accessible buildings
4 – Indicator of the active building. For more info refer to 1.3 (Indicator).
5 – This is your avatar.
Use “arrow keys” or “WASD” to move around and jump.
Use “SPACE”, “numeric keys” & “Mouse” to access buildings.
6 – Pause Button. Use to pause the game and access various options. Refer to the details below.
Also invokable using ‘P’ key.
7 – Workers indicator. Shows how many workers you have & the maximum limit.
8 – Info line. Shows contextual information based on the buildings that are in proximity.
9 – Food indicator. Indicates how much food you have and how much will be needed at the next Upkeep phase.
First number – total food provided by food resources;
Second number – minimal food needed for the gnome to survive;
Third number – total food needed to upkeep the gnome and all of his workers.
The First number also changes color in accordance to current food situation:
Red – There is not enough food for bare gnome needs. Defeat imminent, seek food immediately;
Yellow – There is enough food to upkeep the gnome, but not enough to upkeep all of the workers;
White – There is sufficient food for a full upkeep.
1.2 Pause Screen

Pause screen, here you can stop your game, access settings & quit to menu
1 – Button to replay the tutorial (that was shown on your first launch).
WARNING! By starting the tutorial you drop your current gaming session.
2 The Manual button opens the page you are viewing at the moment on a new tab\window.
3 – Music & Sound toggle buttons.
1.3 Indicator

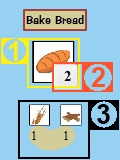
This is an indicator that you’ll see prominently throughout the game in shop screens, buildings etc.
1 – By clicking the icon with your mouse you’ll start the interaction indicated above.
If the indicator is crossed out, it means that the action is inaccessible because there are not enough resources or some other conditions are not met.
2There might be a keyboard key indicator on the icon.
Pressing that key when this indicator is visible results in the same action as pressing it with a mouse.
3 – The indicator might have small icons below. They indicate resource amounts needed to complete the action.
In case there are no icons below, the action is free.
1.4 Upkeep Screen

Upkeep Screen shows up every minute. Every minute you’ll have to feed your gnome and any workers that are currently hired.
Be advised that every worker will increase your total food amount by 0.5 times.
The food amount needed will increase the further you are in your game.
Only food resources can be used for upkeep.
Please note that the time is stopped while the upkeep screen is in action.
Any workers that were not upkeeped will starve and run away from you, so you’ll need to rehire them.
Also note, that you can provide more food than is needed. This will not benefit you in any way.
1 – Icons indicating the resource to be used for upkeep
Clicking this icon is the same as clicking the right arrow on the spinner on the right (indicated by number ‘2’) as it increases the resource to be provided by one.
2 – Spinners to change the amounts of resources to provide for consumption.
The digit is editable so you can punch in the higher numbers with your keyboard after selecting it with your mouse.
3 – The amount of food that one unit of this resource provides
4 – Total food amount provided by your selected resources
5 – Food needed for bare gnome
6 – Food needed to upkeep the gnome and the next tier of workers.
In this case (3 workers currently hired) the current food provision (5) is enough to upkeep the gnome & 1 worker. The indicator shows how much food is needed to upkeep the gnome & two workers. If food total would reach 6 food the indicator would change to show the food needed to upkeep 3 workers.
7 – Full food demand needed to upkeep the gnome & all of his workers.
2. Buildings
You start the game with 5 buildings
Supplementary buildings can be build from lv2 Shop.
Some of them can also be upgraded.
2.1 Woods
Starting building

Woods provide Fishing Bait and Wood
Wait until progress bar fills to produce the resource. The gathering will be paused once the gnome moves or other resource is selected.
The gathering progress will not be lost if you go away, but will be if you start gathering other resource type.
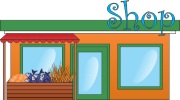
2.2 Shop
Starting building

Press “Space” to enter.
The shop can be upgraded to Lv2 and Lv3. Once upgraded, access the according levels by jumping on top of the previous one.
Lv1 is for buying supplies, selling resources for money and upgrading the shop
Lv2 is for building other buildings
Lv3 allows you to hire workers
Moving the gnome closes any open shop windows.

This is Lv1 shop screen. You can buy various supplies here, sell resources & upgrade the shop itself.
1 – Press ‘Sell’ tab to switch to the Sell screen (see below for details). Can also be switched by pressing “Space” key.
2 – Clothes upgrades give you more money from money generating buildings, as you look more representative to the customers.
Lv2 clothes give you an increase of 50%
Lv3 clothes give you an increase of 100%
3 – Fishing rod upgrade lets you catch the fish faster. Basic rod catches a fish in about 7 seconds.
Please note that you must have the Pier built before any fishing rod upgrades are available for purchase
Lv2 Fishing rod decreases fishing time to 6 seconds
Lv3 Fishing rod decreases fishing time to 4 seconds
4 – Shop upgrades build another shop level on top of the previous one. You can upgrade up to Lv3.

This is Lv1 sell screen. You can sell various resources for money here. The resources can only be sold – you cannot buy them This is the only place where you can get money until you build money generating buildings.
1 – Press ‘Buy’ tab to switch to the Buy screen (see above for details). Can also be switched by pressing “Space” key.
2 – This column represents resource that can be sold for money.
Clicking resource icon results in the same action as pressing right arrow on the amount column (Number 3): it increases the amount by one
3 – In this column you set the desired amount that you want to sell. The number on the bottom will immediately update with the sum of money that you’ll get after selling all the selected resources.
The digit between the arrows can be edited, so you can punch in bigger numbers with your keyboard.
4 – Indicates the worth of one resource unit
5 – Max button allows you to set all of that resource for sale.
6 – Total Money provided by all of the selected resources. Press the Sell button to convert these goods to coins
2.3 Bush
Starting building

Provides Berries
This is your first available source of food.
Start the interaction and wait for the progress bar to fill to collect the resource.
Moving the gnome will stop the gathering, but the progress will not be lost.
Once the berries are picked, it will take some time for the bush to grow back a new batch for you to pick
2.4 Bench
Starting building

Bench serves as your worker management spot. Visit it to redirect your workforce usefully.
Needs at least one hired worker to function properly.
Refer to the worker section for full details.
2.5 Clay hill
Starting building

Provides you with Clay resource.
Press ‘SPACE’ or click on the indicator to start digging the clay.
Moving will pause the digging. The progress is not lost when you move away.
2.6 Pier

You can catch Fish at the pier.
Once built, you immediately gain Lv1 Fishing rod and unlock it’s upgrades at the shop; upgrades improve fishing times.
If fishing is done using the special bait indicated by parentheses ‘()’ beside the bait resource indicator, there is a 50/50 chance that you’ll catch two fishes within the same fishing action. Bait bought from the shop does not have this perk.
To start fishing press ‘SPACE’ key or click the indicator. Wait for the progress bar to fully fill and once it starts overfilling, press ‘Space’ or click the indicator again to pull the fish out.
If the you pull out too early or too late the fish will escape and you will have lost your bait and precious time.
Moving the gnome also cancels the fishing procedure and you loose your bait and the fishing progress.
2.7 Fireplace

Bread, Smoked fish and Bricks can be baked at the Fireplace.
To start baking you need to have the needed amount of resources ant click on the according indicator.
Please note that you are not required to stand by while baking is in progress as moving the gnome will not cancel the progress.
When the baking starts, wait for the progress bar to fill and once it begins overfilling, press the ‘Take out’ indicator to take the new resource out.
If you try to pull it out too early, or too late the used resources will be rendered useless.
It’s impossible to change the resource while baking is in progress (unless you take out the undercooked resource and start over with the new one).
2.8 Farm

Grows Vegetables and Wheat from seeds.
Once built it is immediately provided with one farm patch. You can buy two more from within the main building.
Farming itself is done on the farm patches (see below).

Once over the Farm patch, select your desired interaction to plant the seeds. Once planted they will grow by themselves as indicated by the progress bar, for as long as the soil is not dry (indicated by over-progress).
Click the ‘Water\Harvest’ indicator to water the plant and reduce the dryness to zero. The plant may have to be watered a few times before it is fully grown and ready to be harvested.
If the building is automated, the worker will automatically water any plant that is too dry and harvest the plant once it is ready.
Provided there is a worker inside the storage and there are seeds, a same new plant will be planted in the patch. You can change the plant by walking up to automated patch and pressing on the desired plant.
2.9 Storage house

! Can only be used by hired workers !
It automatically provides resources for Farm, Restaurant and Brewery when they run out so you don’t have to walk up to them every time to fill the needs.
2.10 Restaurant

Restaurant is first of two Money generating buildings.
By serving your customers food you will earn money. Restaurant requires some amount of resources to be present for it to serve customers. These resources are determined by restaurant’s level.
You can upgrade your restaurant using the last icon on interaction selection once within restaurant’s range. Take note, that any leftover resources are lost on upgrade.
Interaction will stop once gnome moves, but the progress is not lost.
The current resource amounts are indicated by small progress bars below the main one which indicates the time left to next payout.
The restaurant levels are:
Lv1 – Requires: Vegetable
Lv2 – Requires: Fish and Bread, has 50% increase in payout
Lv3 – Requires: Smoked Fish, Bread and Berries, has 110% increase in payout, 50% decrease in time spans for payouts
The Payouts are affected by clothing level.
If Storage is occupied by a worker, the required resources will be provided automatically.
2.11 Brewery

Brewery is second of two Money generating buildings.
By serving your customers refreshing beer you will earn money.
Brewery requires Wheat and Wood to function.
You can upgrade your brewery using the last icon on interaction selection once within Brewery’s range. Take note, that any leftover resources ARE taken over on upgrade.
Interaction will stop once gnome moves, but the progress is not lost.
The current resource amounts are indicated by small progress bars below the main one which indicates the time left to next payout.
The brewery levels are:
Lv2 – has 40% increase in payout and 33% decrease in payout time
Lv3 – has 80% increase in payout and 66% decrease in payout time
The Payouts are affected by clothing level.
If Storage is occupied by a worker, the required resources will be provided automatically.
2.12 Bank

Bank is your ultimate goal.
It’s quite expensive but entering it (key ‘SPACE’) will result in victory.
3. Workers

Workers are not to be underestimated when it comes to effective gameplay.
Workers are hired from the top floor (Lv3) of the shop. You can have a maximum of 5 workers hired.
Every time you hire a worker, the next hire will be 50% more expensive, so hiring and laying off is not a very good strategy, or maybe it is?
Also every worker increases the amount of food you’ll have to give out upon upkeep, which can as much as triple your basic food needs.
Once worker is hired you can assign jobs to effectively manage your workforce.
All the buildings can be automated except for Shop & Bench itself.

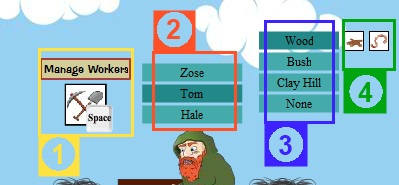
All the worker management is done from your starting Bench.
If you have at least one worker, you may use the Bench.
(1) When in proximity, click ‘Manage Workers’.
(2) This will expand your worker list with every worker’s name. Workers that are currently assigned will have that particular building’s name beside in parentheses. Click the desired worker.
(3) This will expand your active buildings list. Click on the desired building. If the building produces only one resource, the worker is assigned after this step.
(4) In case of Wood & Fireplace you will have to select on of the resources, that you want the worker to produce. (BTW, if you change the worker’s resource in fireplace, while something else is baking, the worker is clever enough to finish baking the last one and then continue with the new task)
4. Intense Mode
You can challenge yourself in a more difficult mode: “Intense” is the game mode that was the first playable-winnable set of parameters inside the game. It seemed a bit too much of a challenge, so we toned it down.
After our musician proposed this to be a playable harder mode, it was recreated and made it to the final release.
The experience in this mode is quite different as compared with quite relaxing “Casual” feel.
A few plays of “Casual” is recommended before attempting “Intense”, as you will need to know all the what-nots or you might be overwhelmed.
4.1 Differences from Casual Mode
The two modes are almost the same except for some key differences:
- Plants in patches are not automatically replanted after they had been harvested, even when the Storage house is manned. You have to manually plant them with your gnome.
- Upkeep costs increase more rapidly.
- More money is provided by the Brewery & Restaurant.
- Slightly decreased fireplace baking times
- Vegetable provides 4 food
Tips & tricks
Some important but often overlooked things:
- It might not seem so, but most of the time is lost while traveling – try to optimize your routes and place workers to save yourself from running back and forth
- Never underestimate the power of your workers. Hire them as early as possible and automate as many buildings as you can
- Don’t be afraid to sell foods. Though it might put you in a tighter spot, foods are still resources that give you the biggest bucks once sold.
- Try not to go all hands food hoarding. The amount of foods will never match the demands that start at 25 minutes and after. Better be quick and flexible.
- Check your resource amounts regularly, especially when there are a lot of workers – it might be that the worker is just taking the food spot because the building he’s at requires a resource that is depleted
Walkthroughs
If you feel like you can’t figure out how to complete the game or maybe need a little push in the right direction, here are the video walkthroughs for the game. The game route taken here is not the optimal one, but it gets the job done

